
Class up your classic shirt dress with some of those stunning ruffles we’ve been seeing on the runways lately! The Ursinia Dress, a more casual sister to our Ulmus Dress released last week, is ideal for your next summer getaway. Cute, comfortable, and fabulously flirty – create it with one of Mood’s new Key Largo prints or try a traditional plaid or chambray to bring it into autumn next month!
 Fabric & materials used:
- 4 yards Mood Exclusive Regality of Renewal Stretch Cotton Sateen
- 1/2 yard Black Single-Faced Woven Fusible Interfacing
- 1 spool Gutermann Bone Thread
- 9 Italian Rose Gold Zamac Shank Back Buttons – 24L/15mm
- MDF066 – The Ursinia Dress Sewing Pattern (free download below!)
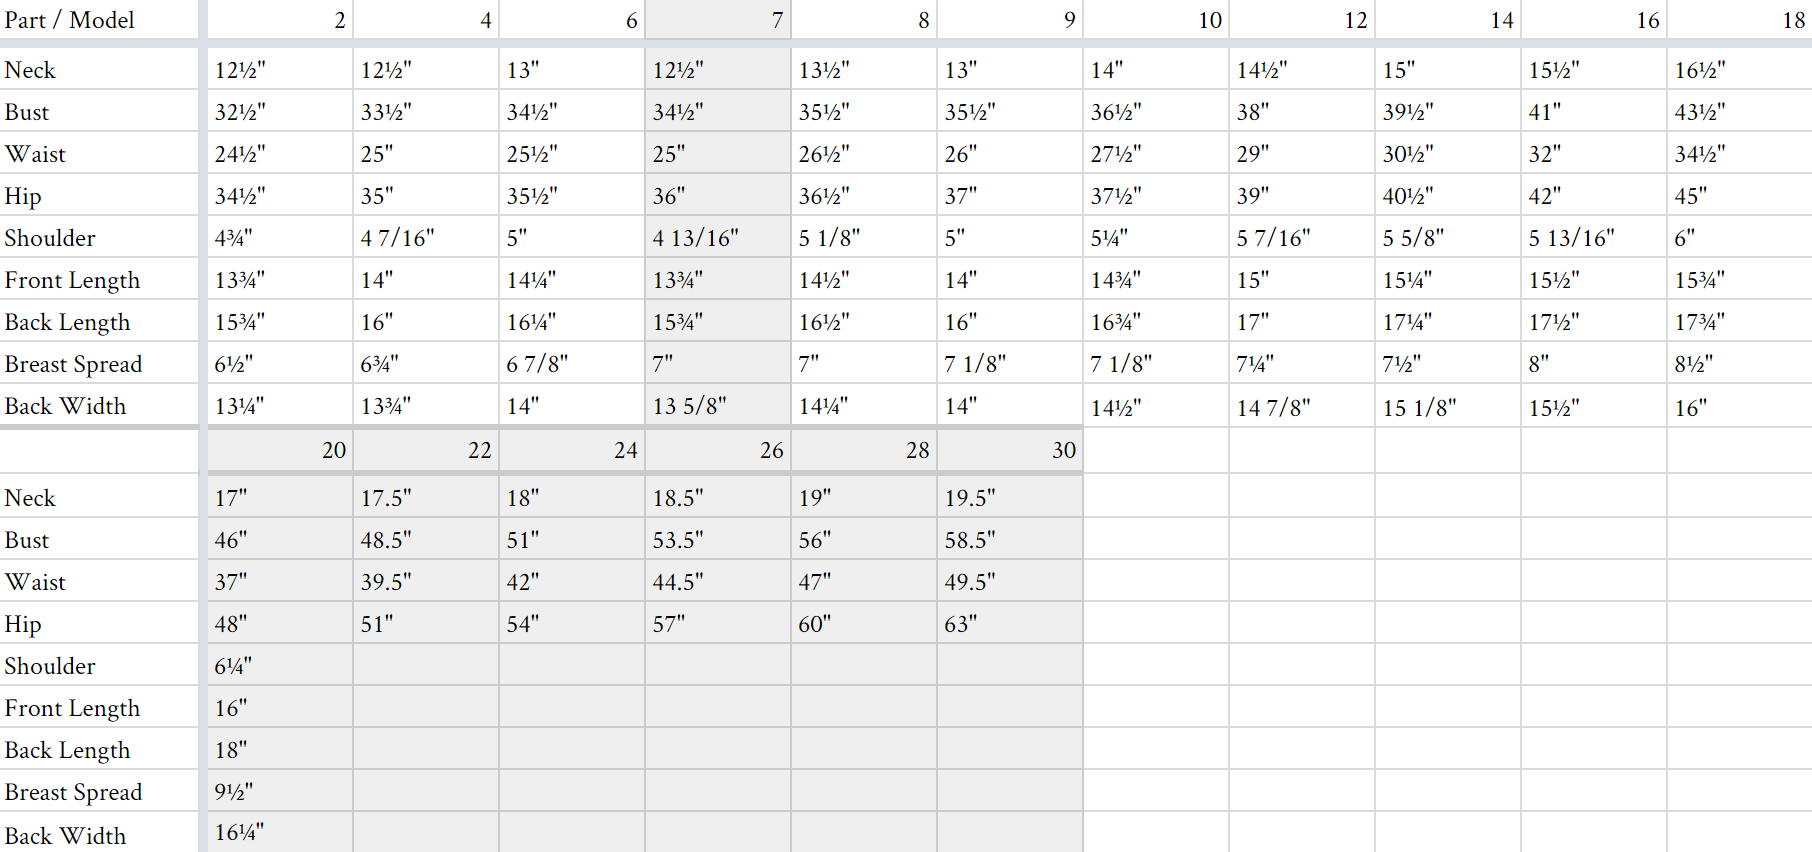
All seam allowances are 1/2″ unless otherwise stated. See chart below for sizing specifications. Note, this specific pattern is available up to a size 30.
Start by interfacing a few of your pattern pieces: 1 collar, 1 collar stand, 1 waistband panel, and 2 cuffs.

Fabric faces together, sew your collar to the collar facing. Trim your seam allowances, turn right side out and press. Repeat with your collar stand, sandwiching your collar in between both collar stand layers as you sew. Turn right side out, press, and set your collar aside for the time being.

Attach your front and back bodice pieces at the shoulders and sides, like you see above. This dress is unlined, so I recommend using French seams.

Fold the center front edges inward 1/2″, press, and then again another 1″. Press and edge-stitch into place. This will be your button placket later on.

Attach your two front upper skirt panels to the back panel, and repeat the previous step to create your button plackets along the front of the skirt.

Evenly gather the skirt into the waistband panels, like you see above. Repeat with your dress bodice, but only attach it to one layer of your waistband. Slip-stitch the second layer.

Roll the outer edge of your skirt ruffle to create your skirt hem. Attach it to the bottom of your upper skirt panels, overlapping the front, like you see above.

Pin and sew one layer of your collar stand to the neckline on the outside of your dress. Fold the raw edges of the second layer inward and slip-stitch.

Add your buttons to your dress, following the guidelines on your pattern, and sew your buttonholes accordingly.

Attach your sleeves at the armholes and evenly gather the bottom into each cuff.

Give your entire dress a solid press and you’re ready to hit your resort getaway!


15 comments
Love the dress, gorgeous lines with just enough “flirt.” I’ve been seeing it in the magazines & stores but haven’t taken the time to look for a pattern for it.
Thank you so much for this stylish pattern.
This is so pretty! Can’t wait to get this one made. Thanks for the great pattern!!
Great looking dress, Courtney.
Thanks so much, Cennetta! 🙂
great silhouette on this dress.
can you occasionally have patterns with bust darts, or a tutorial on how to add darts to a pattern for those of us with big boobies.
Thanks! We have a tutorial on that coming up in a few weeks. 🙂
Love the dress
Love, love, love this dress! I have to add it to my Spring/summer line!
“All seam allowances are 1/2″ unless otherwise stated.” – does this mean that seam allowances are already included in the pattern pieces? Thanks for the pattern! 🙂
Yes, already included! 🙂
When trying to determine what size to make are the dimensions given for actual body measurements or are they finished garment measurements?
Hi Anne – our size chart is body measurements.
hi!
Would this pattern work with linen?
Ty
Hi Sophie, this pattern would work with linen!
This is so pretty! Thanks for the great pattern!!